Chapter 6 Programming
Written on 2022 Sep 04 by Nathan Muncy
This chapter is under construction.
6.1 Introduction
The goal of this chapter is to provide general guidance on a number of topics with an aim to standardize how code is written in the LaBar Lab. Standardization will (1) speed-up the development and trouble-shooting process and (2) support maintenance and use efforts when students and researchers have left the lab.
6.2 Best Practices
A programming adage says that “Code is written once but read many times”. Best practices guide decisions that programmers make when writing their code, ranging from how to name variables to the structure of entire projects, so that their (brilliant) work is accessible to, and maintainable by, others. Many articles, blogs, and books have been written about best practices, so the aim here is not to exhaustively describe all recommendations but to provide some basic principles.
In addition to more language-specific recommendations below, a few guidelines are applicable in any language:
Avoid deep nests of logic. Keeping nested logic as simple as is reasonable will help the next person follow your code (including your future self). Such nests show up in for-loops, conditionals, and method calls. If you are finding yourself spelunking in nests (I try to keep it less than 3 levels) save your future self the headache and restructure your code. Relatedly, have each line of code do only one or two things. A complicated “one-liner” is only cool for 15 seconds, and after that will convolute the code for everyone (including you).
Have meaningful names. Names for variables, functions, methods, modules etc. should be simple and descriptive. We do not want to remember what
imeans in this current loop, nor having to re-read documentation about whatfunction_aandpls_workdo. A good name will be unique in the project’s namespace, human readable, and informative.Minimize technical debt. Time spent up-front is time saved on the life of the project. Take the time to structure your code well and write documentation.
6.2.1 Python
Python has an established history of best practices since PEP8, and modern IDEs like VS Code are configurable to help conform to these (and more modern) recommendations. I recommend using a linter (and it is very easy to install and use in VS Code): linters serve to check for syntax and/or style issues by referencing a predetermined guide. The guide Flake8 is a preferred style that detects both syntax and style issues. Additionally, auto-formatters such as Black can save you the effort of formatting your code according to Flake8 or other recommendations (and can also be installed in VS Code).
As PEP8 is well established and conforming somewhat automated, here I reiterate and make a few suggestions:
- Variable, function, method, module, and package names should be named in
snake_case - Class names should use
PascalCase - Every python file (except maybe
__init__.py) should have a__doc__attribute, preferably at the top of the file - Functions, classes, and methods should also contain a docstring
- Docstrings should be formatted to the Numpy style
- Format comments in sentence case, and use comments to explain the functionality (not syntax)
- Decide whether procedural, functional, or object-oriented programming best suite your task (Section ??)
- Avoid editing code for each use – supply a command-line interface (Section 6.3) if argument parameters are needed
- Encapsulate work within functions, and even simple scripts should put work within a
main()function.
6.3 Command Line Interface
A resource or package is often developed that is a bit flexible, allowing for the functionality to be adjusted by user input. For instance, a general set of steps for functional MRI preprocessing can be written in a script without specifying certain values like the participant and session IDs, task names, or the input and output directories. Such a script would be very useful and portable. It is not recommended, however, to structure your code such that the user must open and edit the code for each use (e.g. new subject, session, or directory path). Rather, build a method of capturing user inputs and supply documentation on what inputs are allowed and their functionality. This section details how to setup such a command line interface.
6.3.1 Python
Python makes requiring, capturing, and specifying command line inputs very easy with the standard argparse package. Here we will use this package to set up a small script.
The __doc__ and import
In a python script called example.py, I first set the __doc__ attribute detailing what work the script does and how to use the script from the command line, using the Numpy style of docstring formats (Figure 6.1, lines 1-10). In practice I actually tend to write the __doc__ attribute last, but this is just an example.
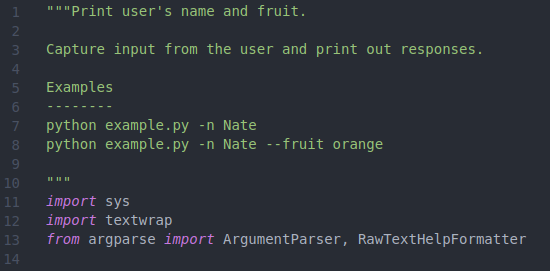
Figure 6.1: __doc__ attribute and imports.
An Examples section is an important aspect of the docstring, and here I supply two examples illustrating the different use cases (lines 7-8). Following the the __doc__ attribute, a few packages are imported: sys will help with counting the number of arguments, textwrap will help with formatting option defaults, and from the argparse package the two most critical classes are ArgumentParser and RawTextHelpFormatter that are used in capturing and communicating the arguments (lines 11-13).
Specifying arguments
Next, we will define a function called get_arguments to receive arguments (Figure 6.2). The first step is to initialize an object called parser that will be used to specify arguments (lines 18-20). Here we specify the description and formatter_class attributes, by setting the description attribute to __doc__, we will be able to include our __doc__ attribute (and the supplied examples) in the help section.
There are many argument configurations possible when using ArgumentParser, and as the documentation is recommended, here we will detail capturing a few strings. Lists, boolean, and other object types are also possible to capture. First in our example we build an optional argument (Figure 6.2, lines 22-33); optional arguments are useful if the developer can anticipate a common argument from the user but still wants to allow the user to specify something else. In our instance, perhaps most people will think “mango” is their favorite fruit (set as the default on line 26), and in the real world perhaps you can anticipate data consistently stored in a specific location. In unpacking lines 22-33, we can see that we are adding an argument available to the user which is accessed via --fruit (Figure 6.2, line 24), the parameter supplied should be a string (Figure 6.2, line 25), the default value is “mango” (Figure 6.2, line 26), and the help provides instruction as well as specifying what is the default value (Figure 6.2, lines 27-32). In this way, if the user does not elect to use the --fruit option, then the code will use the default value of “mango”.
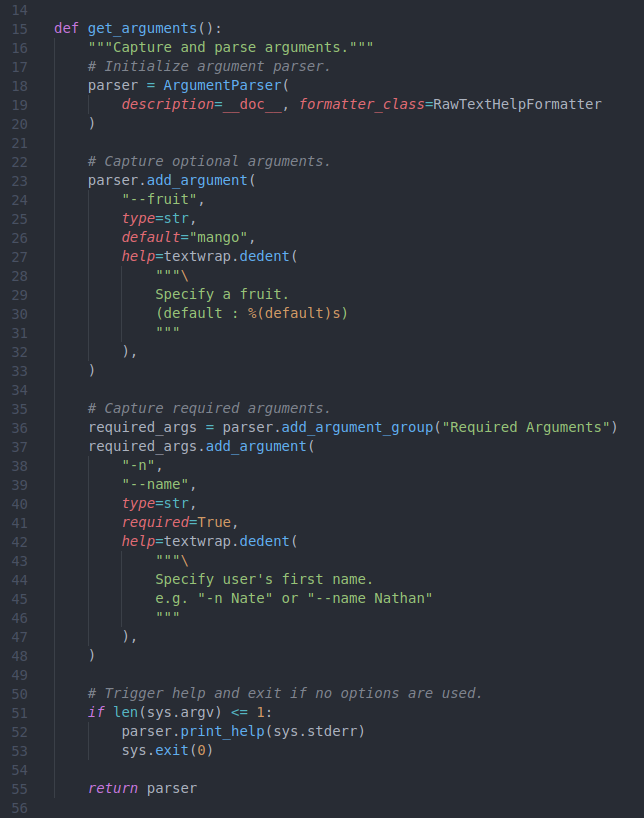
Figure 6.2: Function to require and capture arguments.
Next, we specify a required argument. While the code will not require an optional argument to run, and will use the default value if one is specified, python will stop if it detects that (a) a required argument exists, and (b) the user did not specify it. To make an argument required, one merely needs to specify a required option (Figure 6.2, line 41), but a few extra steps will help organize the help of your code. On line 36 I start a new argument group called “Required Arguments”, the help of these arguments will be printed separately from the optional arguments, and with this ordering (optional first, and then required arguments), the required arguments will appear closest to the command prompt. Next, I build a required argument (Figure 6.2, lines 37-48) in this new “Required Arguments” group, specifying the option required=True. You’ll notice that I used both short and long options (-n and --name, respectively; Figure 6.2, lines 38-39), python developers tend to use long options as they are more informative, and I like to include a short option for required arguments to (a) visually distinguish between optional and required arguments in examples and (b) save on user typing time as these options will always be used. Finally a help and example is supplied (Figure 6.2, lines 42-47). The various options and their parameters are returned by the get_arguments function on line 55.
Finally, a common practice is to for the user to execute a script or package without any arguments specified in order to print a help. To accomplish this, we trigger the print_help function of the parser object if no arguments are used and then terminate the script (Figure 6.2, lines 51-53).
The work
Now that optional and required arguments have been specified, we are ready to put those arguments to use! Figure 6.3 supplies the main function where the arguments are assigned and then used. On line 61 I first access the object returned by the get_arguments function and parse the arguments, parsing assigns each argument to its own attribute that is accessible via the supplied option. I can then set the values supplied by the user to new variables (Figure 6.3, lines 62-63). The user_name and user_fruit variables, which contain default and user-specified parameters, are now able to be used in the script. Line 66 simply uses the variables to print a sentence out to the console.
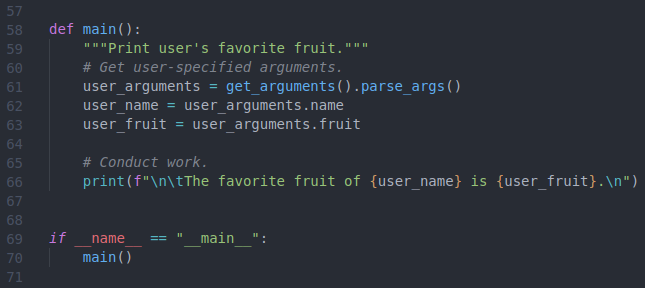
Figure 6.3: Use arguments to print.
By encapsulating the work in main and including the dunder __name__ conditional (lines 69-70, also see this) we can set our script up to be executable from the command line. Let’s start testing with this, and here is the code for your convenience:
"""Print user's name and fruit.

Capture input from the user and print out responses.

Examples
--------
python example.py -n Nate
python example.py -n Nate --fruit orange

"""
import sys
import textwrap
from argparse import ArgumentParser, RawTextHelpFormatter

def get_arguments():
    """Capture and parse arguments."""
    # Initialize argument parser.
    parser = ArgumentParser(
        description=__doc__, formatter_class=RawTextHelpFormatter
    )

    # Capture optional arguments.
    parser.add_argument(
        "--fruit",
        type=str,
        default="mango",
        help=textwrap.dedent(
            """\
            Specify a fruit.
            (default : %(default)s)
            """
        ),
    )

    # Capture required arguments.
    required_args = parser.add_argument_group("Required Arguments")
    required_args.add_argument(
        "-n",
        "--name",
        type=str,
        required=True,
        help=textwrap.dedent(
            """\
            Specify user's first name.
            e.g. "-n Nate" or "--name Nathan"
            """
        ),
    )

    # Trigger help and exit if no options are used.
    if len(sys.argv) <= 1:
        parser.print_help(sys.stderr)
        sys.exit(0)

    return parser


def main():
    """Print user's favorite fruit."""
    # Get user-specified arguments.
    user_arguments = get_arguments().parse_args()
    user_name = user_arguments.name
    user_fruit = user_arguments.fruit

    # Conduct work.
    print(f"\n\tThe favorite fruit of {user_name} is {user_fruit}.\n")


if __name__ == "__main__":
    main()
Running the script
If we recall lines 51-53 (Figure 6.2), our script should print out a help if we execute it without any arguments. When we do so, observe how the help is built from both our __doc__ attribute (Figure 6.1, lines 1-10) as well as the help options specified in the get_arguments function. Additionally, as we created a separate “Required Arguments” group, these options are separated from the optional arguments (Figure 6.2, line 36).
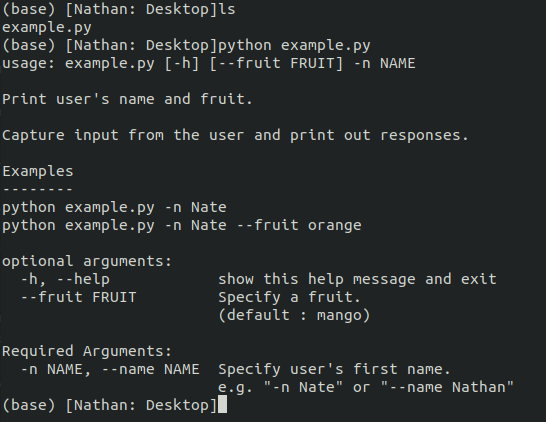
Figure 6.4: Executing script without arguments to print help.
Next, the --name should be required, so what happens if we try to run the code with only the optional argument specified? Notice that a condensed help is printed to the console, detailing the usage and giving the error of missing required arguments.

Figure 6.5: Executing script without required arguments.
Finally, we can test both the optional and required arguments.

Figure 6.6: Executing script with optional and required arguments.
6.4 Documentation
Generally speaking, documentation is used for structuring and communicating your code or program. As documentation is used at different levels of programming and for different purposes so do its methodologies. At the planning stage, documentation can be used to sketch out the scaffolding of your program, planning what functionality will be written in which file and also providing a general organization to the project. At the development and maintenance stage, documentation both communicates the functionality of blocks of code and provides a framework to guide code insertions and refactoring. At the implementation or execution level, documentation provides information the user needs to effectively use the code and resolve any errors.
Documentation also serves as a “knowledge capture”, an important aspect when personnel turnover every few years. By documenting code well, a future user will know (a) what it does, (b) how to use it, (c) how to resolve errors, and (d) how to maintain it. As documentation serves many functions, it is found in many locations. Documentation about the structure and functionality of the code is often found within the code itself in the form of comments, and documentation about how to use the code is typically found within a help function or file. Finally, documentation about the project as a whole can take the form of a README, book, or webpage.
As documentation can serve many functions and be located in different forms and media, here we provide some guidelines with an aim of standardizing practices. Standard practices for documentation ensures that both users and developers can find, read, and understand the type of documentation needed for their task.
6.4.1 Python
A range of practices and tools are available to help with documentation in python, from guidelines to software that can build html pages from properly-formatted documentation. When leveraged these practices and tools can make code quite accessible.
Comments
The role of comments is to describe what a certain block of code does. Write the comment for an audience that can read code, that is, explain what is happening and why while avoiding an explanation of the syntax. Comments should be used like salt – too little or too much is problematic while the right amount makes your mother proud. Pairing with proper naming conventions should allow the next reader to fully understand what is happening in the current section of code.
Comments should be written and sentence case and preceded by a single “#” and space. Line length guidelines apply to comments, so longer comments should take the form of a left-justified block. Figure 6.7 provides a few examples of less-than-helpful comments.
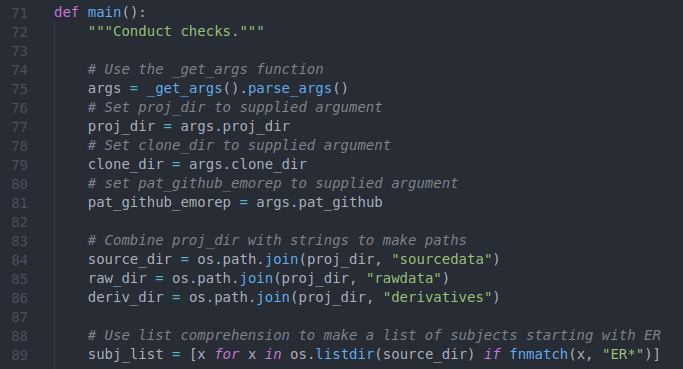
Figure 6.7: Examples of bad comments.
While any comments (as long as they are not wrong) are better than the absence of comments, a few grievances can be expressed about this commenting style. First, each comment only describes the syntax, making the comment redundant for anyone that can read the code (and assume your reader can read the code when writing comments!) Second, too many comments are supplied – lines 77, 79, and 81 do very similar things, so their corresponding comments say largely the same thing. All this clutters the code. A better example is shown in Figure 6.8, where a comment is supplied for each section of work.
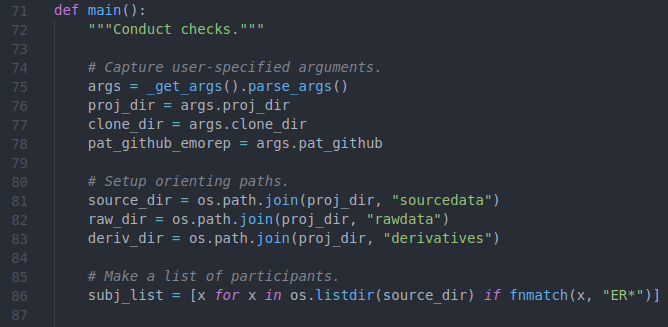
Figure 6.8: Examples of good comments.
While the examples here are rather simple, and so the comments still somewhat describe the code, as the functionality becomes more complex it will be important to remember to describe the point of a section of code, not the syntax itself. And if the syntax is very dense and confusing, a comment is definitely warranted to guide the programmer but restructuring is also likely warranted.